Home›Blog ›NK103 C-Arm Collimator Replacement Guide: Compatibility & Installation Checklist
NK103 C-Arm Collimator Replacement Guide: Compatibility & Installation Checklist
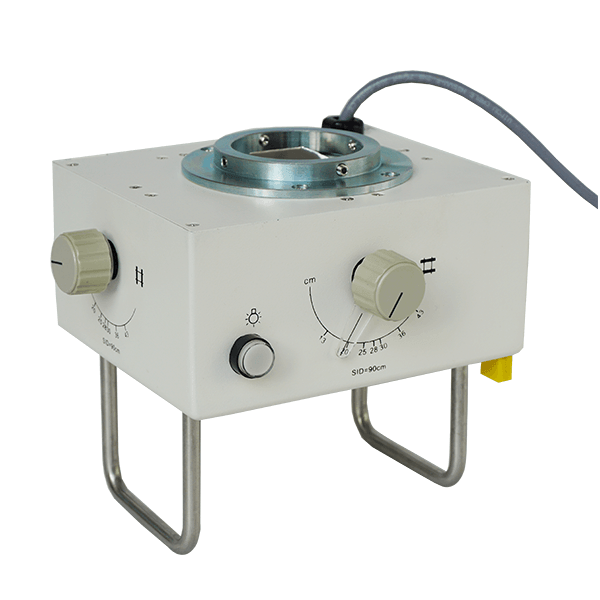
A collimator rarely fails on its own — but when a C-arm comes in for tube replacement, refurbishment, or a lamp/blades repair, the old collimator often gets replaced at the same time. That’s when purchasing engineers and biomedical technicians start searching for one specific question:
“Will this collimator bolt onto my tube, and how do I install it correctly?”
This guide answers that for the Newheek NK103 manual X-ray collimator — one of the most widely used replacement collimators for mobile C-arms, portable X-ray units, and stationary radiography systems rated up to 125 kV. If your current unit is discontinued, damaged, or being swapped during a tube upgrade, this is the checklist to work through before you order.
Product page: Newheek NK103 Manual X-Ray Collimator for C-Arm Equipment
1. NK103 Key Specifications (Verify These First)
Before anything else, confirm the three parameters that decide whether the NK103 can physically and electrically replace your current collimator:
| Parameter | NK103 Value | Why It Matters |
| Max tube voltage | 125 kV | Must be ≥ your machine’s maximum clinical kV |
| Focus-to-mounting-surface distance | 40 mm (adjustable on request) | Determines whether the X-ray focal spot lands at the designed entrance point of the collimator |
| Max irradiation field | 430 mm × 430 mm @ SID 90 cm | Must cover your detector / film size at working distance |
| Min irradiation field | < 10 mm × 10 mm | Collimated down for small FOV fluoroscopy |
| Shielding leaves | 1 layer, manual drive | Knob + pointer scale for field size setting |
| Inherent filtration | 1 mm Al @ 75 kV | Meets minimum filtration requirements for diagnostic work |
| Positioning lamp | 12 V / 50 W, >160 lux, >4:1 contrast ratio, 30 s auto-off | Light field must visibly match radiation field |
| Dimensions / weight | 180 × 155 × 100 mm, ≈2.6 kg | Clearance check inside the tube housing assembly |
The 40 mm focus distance is the number that catches most buyers. The NK103 is manufactured with a 40 mm focus-to-mounting-surface distance, and it can be adjusted to match your specific equipment — but you must tell the supplier your measured value before ordering, not after the unit arrives.
2. Compatibility Check: Will the NK103 Fit Your C-Arm?
The NK103 is designed to match most mainstream brands of X-ray tubes used on mobile C-arms, portable units, and standard radiography machines. In practice, compatibility comes down to four mechanical/electrical checks:
2.1 Mounting flange interface
- Measure the bolt-circle diameter, hole count, and hole spacing of the flange on your tube’s output window (typically a 4-hole pattern — measure hole-to-hole center distance across the pattern).
- Photograph the existing collimator-to-tube joint from two angles. A supplier can confirm the interface (or supply an adapter ring) far faster from photos + measurements than from a machine model name alone.
2.2 Focus-to-mounting-surface distance
- With the old collimator still mounted, measure from the tube focal spot reference plane to the collimator mounting face.
- If your measured distance is not 40 mm, request the NK103 with an adjusted distance — this is a standard modification, not a custom project.
2.3 Voltage and power
- Tube side: your machine must operate at or below 125 kV. The NK103 is intended for medical diagnostic tubes under this limit.
- Lamp side: the positioning lamp runs on AC 12 V. Confirm your machine’s existing collimator lamp supply (voltage and connector type). If you’re replacing a 24 V lamp system, mention it at inquiry — the supply can be matched.
2.4 Filtration and regulatory expectations
- The NK103 ships with 1 mm Al inherent filtration at 75 kV, which satisfies standard diagnostic filtration requirements. If your market’s regulator requires total filtration documentation, request the spec sheet and certificate with your order.If all four checks pass — flange pattern confirmed, focus distance matched (or adjustable), kV ≤ 125, lamp supply compatible — the NK103 is a direct physical replacement for most C-arm and mobile-unit collimators.Not sure about any measurement? Send your tube model, flange photos, and measured distances to the inquiry form and get a compatibility confirmation before you buy.
3. Pre-Installation Checklist (Free PDF)
Before the old collimator comes off, complete this checklist. It takes about 15 minutes with the machine powered down and prevents the two most common failure modes: a collimator that doesn’t bolt on, and a light field that doesn’t match the radiation field.
Download: NK103 Pre-Installation Checklist (PDF)
The full checklist includes:
- Machine data recorded — manufacturer, model, tube housing model, max clinical kV (must be ≤ 125 kV)
- Old collimator measured — flange bolt pattern & hole spacing (mm), focus-to-mounting-surface distance (mm), overall clearance available
- Lamp supply verified — AC 12 V present, connector type photographed, 5 A fuse confirmed in lamp circuit
- Radiation safety prepared — area controlled, personal dosimetry worn, machine locked out for mechanical work
- Tools staged — hex key set, torque screwdriver, measuring tape, spirit level, tape/ruler for SID measurement
- Documentation on hand — NK103 packing list, flange gasket/O-ring (if your housing uses one), thread-locker rated for the application
4. Removal of the Old Collimator
- Power down and lock out. Switch off the machine, disconnect mains power, and confirm the tube is cold. Never loosen a collimator on a powered tube housing.
- Mark the orientation. Draw a line across the old collimator and the flange before removal — leaf orientation matters for the light field mirror axis.
- Disconnect the lamp cable at the connector (not by pulling the wire).
- Support the weight. A collimator on a C-arm can be a 2–5 kg cantilevered mass. Support it with one hand or a strap before removing the last flange bolt.
- Remove the mounting bolts evenly (loosen in a star pattern) and lift the unit off. Keep the bolts, gasket, and any spacer rings — you may reuse them.
5. Installing the NK103
- Inspect the mating surfaces. The tube’s output window flange and the NK103 mounting face must be clean, dry, and burr-free. Residual gasket material causes beam leaks and skewed seating.
- Orient the collimator so the lamp housing and adjustment knobs are accessible from the operator’s side of the C-arm, and so the marked orientation line matches the old unit’s position.
- Seat the unit against the flange and start all bolts by hand before tightening. Tighten in a star pattern, evenly, to a snug-but-not-brutal torque — over-tightening a die-cast housing warps the mounting face and misaligns the beam.
- Connect the lamp cable. Confirm the 12 V supply; the NK103’s 50 W lamp should light immediately when the field-light switch is pressed, and auto-off after 30 s.
- Reinstate power per your facility’s procedure and verify the machine recognizes no interlock faults.
6. Beam Alignment & Light Field Calibration
A replacement collimator is only “installed” once the light field and radiation field agree. This is the step most replacement guides skip — don’t.
6.1 Mechanical centering
- With the collimator open to its largest field, visually confirm the beam exit window is concentric with the tube output port. A spirit level across the collimator body helps on mobile units with tilted tube heads.
6.2 Light field vs. radiation field test
- Set SID to 90 cm (or your standard working distance — use the optional SID measuring band tape if fitted).
- Open the NK103 to a defined field (e.g., knob pointer at mid-scale) and place film or a flat-panel detector under the light field edges with radiopaque markers (coins or lead rulers work).
- Expose at low technique settings (e.g., ~60–70 kV, low mAs).
- Compare the exposed field to the light field edges. Acceptable practice keeps the divergence between light field and radiation field within a small fraction of the SID — if the offset is consistent in one direction, the collimator needs rotation on the flange; if it’s radial, re-check seating.
6.3 Field size verification
- Confirm the maximum achievable field at your working SID covers your detector size. At SID = 90 cm the NK103 delivers up to 430 mm × 430 mm — enough for a full-size detector plate on mobile and portable systems.
- Confirm the minimum field closes to under 10 mm × 10 mm for tight fluoroscopy collimation, and that the knob pointer scale tracks consistently across the travel.
6.4 Final functional pass
- Cycle the lamp 3–4 times: it must reach >160 lux brightness immediately and cut off after 30 s.
- Sweep the full kV range you clinically use (up to 125 kV) and inspect for leakage around the mounting flange during a fluoroscopy-on test with the field minimized.
7. Troubleshooting Quick Reference
| Symptom | Likely Cause | Fix |
| Light field offset from radiation field, uniform direction | Collimator rotated on flange | Loosen bolts, rotate to marker line, retighten |
| Light field smaller/larger than radiation field | Focus-to-mount distance mismatch | Re-measure; order/adjust 40 mm focus distance to match |
| Beam leakage at flange | Gasket missing or seating warped | Fit gasket, re-torque in star pattern |
| Lamp does not light | No 12 V supply / blown 5 A fuse | Verify supply and fuse before suspecting the lamp |
| Field won’t close fully | Leaf drive obstruction from shipping bolt or debris | Inspect leaf track, remove transit material |
8. FAQ
Q: Can the NK103 replace a collimator on a brand-name C-arm?
A: The NK103 is engineered to match most mainstream brands of X-ray tubes. Compatibility is confirmed by flange pattern and focus distance, not brand name — send your measurements and we’ll confirm fit.
Q: My machine runs at 100 kV. Is 125 kV overkill?
A: No — headroom is good. The 125 kV rating is a maximum; operating below it is normal and extends leaf and lamp life.
Q: My focus-to-mount distance isn’t 40 mm.
A: The 40 mm distance can be adjusted according to your equipment’s requirement. Provide the measurement at inquiry.
Q: Is it really manual?
A: Yes — the NK103 uses manual knob adjustment with a pointer scale. No motor, no control board, no driver software: one reason it’s a popular drop-in replacement for aging C-arms.
Get the Checklist + Compatibility Confirmation
Download the NK103 Pre-Installation Checklist PDF, and if you include your tube model, flange photos, and measured distances in the form, our engineers will confirm compatibility before you commit to an order — usually within one business day.
Download the checklist & request compatibility confirmation
Related pages:
Author:X Ray Collimator
X Ray Collimator
Blog
- NK103 C-Arm Collimator Replacement Guide: Compatibility & Installation Checklist
- Collimation in Radiology: Practical Guide for Safe, High-Quality X-Ray Imaging
- Application of collimator for sale to X-ray machines
- Collimator Box | Price & Specifications – Manufacturer Direct
- Latest Collimator Specs & Selection Tips
contact us
TEL:+86 19015366638
E-mail:newheekcn@163.com
Company:Weifang Newheek Electronic Tech Co., Ltd.
ADD:E Building of Future Star Scientific Innovation Industrial Zone of No.957 Wolong East Street, Yulong Community, Xincheng Sub-District Office, Weifang Hi-tech Zone, Shandong Province, China